Equal Cost Multipath Routing With Mikrotik Router OS

Posted by Admin Tuesday, March 22, 2011 0 comments
This script demonstrates one method of doing automatic failover using the Netwatch function and using scripting to enable or disable gateways. This is probably not the most efficient way, but it works. I would welcome any input on how it can be improved.
The situation:

You have 2 lines going out to the internet - 10.0.0.12 and 10.0.0.13. You have setup a mangle to mark HTTP traffic (optional) and want to route http along the 2 lines using load balancing.
You setup the mangle:
/ip firewall mangle add
chain=prerouting protocol=tcp dst-port=80 action=mark-routing \
new-routing-mark=ecmp-http-route passthrough=yes comment=" Route HTTP \
traffic to ECMP" disabled=no

You set up ECMP (Equal Cost Multipath Routing) by using something like
/ip route add dst-address=0.0.0.0/0 gateway=10.0.0.12,10.0.0.13 \
routing-mark=ecmp-http-route comment="ECMP route for HTTP"
Now you have ECMP for HTTP only. This is nice because MSN messenger, banking websites and other programs and problem sites will not be broken in the same way it might be if you used ECMP for all protocols.
What I then do is for example mark SMTP traffic and route this out through 10.0.0.12:
/ip firewall mangle add
chain=prerouting protocol=tcp dst-port=25 action=mark-routing \
new-routing-mark=smtp-out passthrough=yes comment="SMTP Traffic" disabled=no
/ip route add
dst-address=0.0.0.0/0 gateway=10.0.0.12 routing-mark=smtp-out \
comment="SMTP Traffic out"
and route all other traffic through 10.0.0.13
/ip route add
dst-address=0.0.0.0/0 gateway=10.0.0.13 comment="Default Route to Internet"
Then I need to setup 2 routes to specific addresses to force the router through specific gateways to "test" the links. These should not be popular addresses with your users! Otherwise when a gateway goes down they will have no access to those sites. The addresses I am using as an example are 1.1.1.12 to test 10.0.0.12, and 1.1.1.13 to test 10.0.0.13.
Next I use the Netwatch Function to switch all traffic to the working gateway should any of the gateways fail:
/ tool netwatch
add host=1.1.1.13 timeout=2s interval=30s up-script="/ip route set \
\[find comment=\"Default Route To Internet\"\] gateway=10.0.0.13" \
down-script="/ip route set \[find comment=\"Default Route To Internet\"\] \
gateway=10.0.0.12 comment="" disabled=no
add host=1.1.1.12 timeout=2s interval=30s up-script="/ip route set \
\[find comment=\"SMTP Traffic out\"\] gateway=1.0.0.12" down-script="/ip \
\n" \route set \[find comment=\"SMTP Traffic out\"\] gateway=10.0.0.13
comment="" disabled=no
The problem is that the ECMP http route will still be active, therefore http traffic wont work, so I have 2 scripts to check if both gateways are up or down and take action accordingly:
/ system script
add name="ecmp-startup" source=":if ([/ping 1.1.1.12 count=1]=1 && \
[/ping 1.1.1.13 count=1]=1 && [/ip route get [find \
comment=\"ECMP Route For HTTP\"] disabled]=true) do={ :log info \"Both gateways up\" \
\n/ip route set [find routing-mark=ecmp-http-route] \
disabled=no}" policy=ftp,reboot,read,write,policy,test,winbox,password
add name="ecmp-shutdown" source=":if ([/ping 1.1.1.12 count=1]=1 && \
[/ping 1.1.1.13 count=1]=0) do={ :log info \"Gateway down\"\
\n/ip route set [find routing-mark=ecmp-http-route] \
disabled=yes}" policy=ftp,reboot,read,write,policy,test,winbox,password
Hi I found this error while trying to use this script, what worked for me was
ecmp start/shut script. Looks like  in the start and shut script (") are missing
from the find, well other the script works wonders for me. Thanks a lot savagedavid
ecmp starthp script
:if ([/ping 1.1.1.13 count=1]=1 && [/ping 1.1.1.12 count=1]=1 && [/ip route get \
[find routing-mark="ecmp-http-route"] disabled]=true) do={:log info "Both Gateways are up" \
/n/ip route set [find routing-mark="ecmp-http-route"] disable=no}
ecmp shutdown script
:if ([/ping 1.1.1.13 count=1]=0 || [/ping 1.1.1.12 count=1]=0) do={:log info \
"Gateway down" /ip route set [find routing-mark="ecmp-http-route"] disabled=yes}

Notice that it first checks to see if the route is enable before trying to re-enable it. Otherwise it will reset the route and users will be dropped momentarily.

Then finally schedule the scripts to check every 30 seconds:
/ system scheduler
add name="gateway-check" on-event="/system script run ecmp-shutdown
script run ecmp-startup" start-date=jan/01/1970 start-time=00:00:00 \
interval=30s comment="" disabled=no
(wimi)

AAA with Mikrotik + Microsoft IAS(Internet Authentication Service) & Active Directory

Posted by Admin 0 comments


Topolog

Step by step :

1) Set Radius Client to Active Directory Server, in this case IAS is for Radius Server.


[admin@MikroTik] /radius> add service=login,hotspot address=[ip address AD server] secret=123456 authentication-port=1812 accounting-port=1813

2) Make 2 groups, admin and viewer

Admin :
[admin@MikroTik] /user group> add name=admin policy=ftp,password,read,sensitive,ssh,test,winbox ,local,policy,reboot,sniff,telnet,web,write

Viewer :
[admin@MikroTik] /user group> add name=viewer policy=read,telnet,winbox

3) Activate the radius function.

[admin@MikroTik] /user aaa> set use-radius=yes

4) Windows configuration : make active directory full with dns local, than add IAS within Control Panel => Add or Remove Programs => Add/Remove Windows Components => choose Networking Services => click Details => choose Internet Authentication Servive. (note: do the same for DNS)


5) After IAS installed, next configuration is IAS that used for Radius Server and linked to mikrotik. (note: register IAS to active directory first).

i) Setting Radius Clients :
a. Create new radius clients
b. Input values below, with IP address is ip router mikrotik that directly connected to IAS. (note: shared secret must equal to IAS and at mikrotik)


ii) Setting Connection Requst Policies
a. Create new connection request policy , than next and choose custom policy.

b. Di policy conditions, klik add pilih opsi Client-IP-Address. Input IP Address to router mikrotik. Connection request policies used to authentication proccess between mikrotik with Microsoft IAS.

c. Click edit, choose advanced and remove attribt in advanced tab.


iii) Setting Remote Access Logging
a. Go to remote access logging, than click Local File. Set value as below or with your own config.


iv) Set remote access policies. This Configuration is for user authentication proccess and user authorization.

a. First we make admin authentikasi and authorization for admin user. Create new remote access policy. Choose custom policy, than custom for name. Than Click add, atribut,Windows-Groups atribut, After that, choose group from domain group that we make at active directory. group scope must global


b.Step two is , set profile from access policy. choose Edit Profile,uncheck MS-CHAPv2, MS-CHAP, CHAP. Just check PAP, SPAP. In Encryption tab uncheck No encryption.


c.Step trhee is authorization proccess. Go to the advanced tab, at list atribut choose Vendor-Specific. click add input value at Enter Vendor Code 14988 with status Yes. It conforms. click configure attribute, input vendor-assigned number : 3, at Attribute value input admin (note: attribute value same with group name in mikrotik yang telah dibahas pada tahap awal).


d.We got AAA Mikrotik with Active Directory + Microsoft IAS config.


(sky16 / fm)

Mikrotik + Squid Web Proxy

Posted by Admin 1 comments
Mikrotik + Squid Web Proxy - Ip Addrees Configuration :

1. IP Mikrotik:
- 192.168.10.15 = to local
- 192.168.12.15 = to squid proxy
- 192.168.5.181 = to public

2. IP squid (use IPCop)
- 192.168.12.1 = squid proxy

3. IP Client: 192.168.10.0/24

Set web proxy port at ip cop with port 878
Set the cache e.g. 15M or 15000

Mikrotik configuration :

Code:
/ ip address
add address=192.168.5.181/24 network=192.168.5.0 broadcast=192.168.5.255 \
interface=Public comment="" disabled=no
add address=192.168.10.15/24 network=192.168.10.0 broadcast=192.168.10.255 \
interface=Lan comment="" disabled=no
add address=192.168.12.15/24 network=192.168.12.0 broadcast=192.168.12.255 \
interface=Proxy comment="" disabled=no
setting route:

Code:
/ ip route
add dst-address=0.0.0.0/0 gateway=192.168.5.15 scope=255 target-scope=10 \
comment="" disabled=no
setting dns:

Code:
/ ip dns
set primary-dns=192.168.5.182 secondary-dns=192.168.5.205 \
allow-remote-requests=no cache-size=2048KiB cache-max-ttl=1w
/ ip dns static
add name="192.168.5.3" address=192.168.5.3 ttl=1d
setting nat:

Code:
/ ip firewall nat
add chain=dstnat protocol=tcp dst-port=81 action=dst-nat \
to-addresses=192.168.12.1 to-ports=81 comment="Untuk IP Cop" disabled=no
add chain=dstnat protocol=tcp dst-port=445 action=dst-nat \
to-addresses=192.168.12.1 to-ports=445 comment="Untuk HTTPS IPCOP" \
disabled=no
add chain=dstnat src-address=!192.168.12.0/24 protocol=tcp dst-port=80 \
action=dst-nat to-addresses=192.168.12.1 to-ports=878 comment="" disabled=no
add chain=dstnat src-address=!192.168.12.0/24 protocol=tcp dst-port=443 \
action=dst-nat to-addresses=192.168.12.1 to-ports=878 comment="" \
disabled=no
add chain=srcnat out-interface=Public action=masquerade comment="" disabled=no
setting mangle:
Code:
/ ip firewall mangle
add chain=forward content="X-Cache: HIT" action=mark-connection \
new-connection-mark=squid_con passthrough=yes comment="" disabled=no
add chain=forward connection-mark=squid_con action=mark-packet \
new-packet-mark=squid_pkt passthrough=no comment="" disabled=no
add chain=forward connection-mark=!squid_con action=mark-connection \
new-connection-mark=all_con passthrough=yes comment="" disabled=no
add chain=forward protocol=tcp src-port=80 connection-mark=all_con \
action=mark-packet new-packet-mark=http_pkt passthrough=no comment="" \
disabled=no
add chain=forward protocol=icmp connection-mark=all_con action=mark-packet \
new-packet-mark=icmp_pkt passthrough=no comment="" disabled=no
add chain=forward protocol=tcp dst-port=1973 connection-mark=all_con \
action=mark-packet new-packet-mark=top_pkt passthrough=no comment="" \
disabled=no
add chain=forward connection-mark=all_con action=mark-packet \
new-packet-mark=test_pkt passthrough=no comment="" disabled=no
terus queue :
Code:
/ queue simple
add name="Squid_HIT" dst-address=0.0.0.0/0 interface=all parent=none \
packet-marks=squid_pkt direction=both priority=8 \
queue=default-small/default-small limit-at=0/0 max-limit=0/0 \
total-queue=default-small disabled=no
add name="Main_Link" dst-address=0.0.0.0/0 interface=all parent=none \
direction=both priority=8 queue=default-small/default-small limit-at=0/0 \
max-limit=35000/256000 total-queue=default-small disabled=no
add name="game_tales_of_pirate" dst-address=0.0.0.0/0 interface=all \
parent=none packet-marks=top_pkt direction=both priority=1 \
queue=default-small/default-small limit-at=0/0 max-limit=0/0 \
total-queue=default-small disabled=no
add name="Ping_queue" dst-address=0.0.0.0/0 interface=all parent=none \
packet-marks=icmp_pkt direction=both priority=2 \
queue=default-small/default-small limit-at=0/0 max-limit=0/0 \
total-queue=default-small disabled=no
add name="The_other_port_queue" target-addresses=192.168.12.0/24 \
dst-address=0.0.0.0/0 interface=all parent=Main_Link packet-marks=http_pkt \
direction=both priority=8 queue=default-small/default-small \
limit-at=5000/5000 max-limit=50000/256000 total-queue=default-small \
disabled=no
add name="another_port" target-addresses=192.168.10.0/24 dst-address=0.0.0.0/0 \
interface=all parent=Main_Link packet-marks=test_pkt direction=both \
priority=8 queue=default-small/default-small limit-at=0/0 \
max-limit=0/256000 total-queue=default-small disabled=no


(ad/fm)

RB250GS Vlan Trunk Configuration

Posted by Admin Friday, March 11, 2011 0 comments
RB250GS Vlan Trunk Configuration - Below The Mikrotik RoutesOS Configuration, using one interface for trunk port to RB250GS

Setting HSDPA Modem Huawei E220 On Mikrotik

Posted by Admin 0 comments
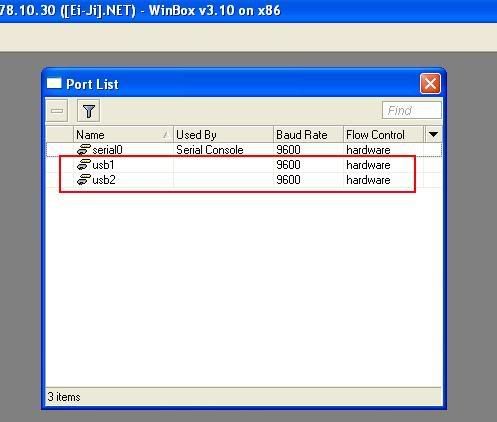
Plug USB Huawei E220 into mikrotik than we got:


check to ensure the device work properly

PPPoE Server Connection

Posted by Admin 1 comments
Choose PPP on Mikrotik Winbox Menu


choose PPPoe Server tab

1. Click (+) , choose tab PPPoe server.
2. Service Name - optional
3. Interface – depend what interface you use it, in this we use Wireless
4 Max MTU / MRU : default
5. Default profile - pppoe wlan ( this is ip pool where range to include in pppoe server. )

Prevent Self Interference With 3 Mini PCI in One Board

Posted by Admin 0 comments
To Prevent Self Interference With 3 Mini PCI in One Board, there is Adaptive Noise Immunity (ANI). There are 2 choises of ANI, ap-and-client-mode dan client-mode.

Use ap-and-client-mode if the RB mode is ap-bridge
Use client-mode if the RB mode is (mikrotik only)

To Activate ANI tool is:

Queue Tree Share

Posted by Admin 0 comments
This article is about bandwidth share for users to get same average speed for each user. Queue Tree can make this prevent users to download that can spend lot of bandwidth and make other user can't use another bandwidth.

Here's the configuration for inbound trafic: