Showing posts with label mikrotik wireless. Show all posts

MikroTik New RB951-2n

Posted by Admin Thursday, May 24, 2012 0 comments
MikroTik Router RB951-2nIf you thought the RB751 couldn’t get any cheaper, MikroTik have specs available for download now for the new RB951-2n.

Smaller and cheaper than the 751. No USB port or external antenna though. No date on release yet, but pre-production samples are available soon to distributors.


Now you can build and improve your network security with mikrotik router without high cost.

The RB951-2n is the home wireless AP you have been waiting for. It has five Ethernet ports and a 802.11b/g/n wireless AP with an antenna built in.

This model is much smaller than the more powerful 2HnD model, the RB951-2n looks exactly like our popular RB750 series. The device is very small and will look good in any home or

office, wall mounting anchor holes are provided. 


Heres the specification of RB951-2n :

CPU Atheros AR9331 300MHz

CPU Memory 32MB

DDR SDRAM onboard memory

Ethernet Five independent 10/100 Ethernet ports

LEDs Power, NAND activity, 5 Ethernet LEDs

Power options PoE:  8-30V DC on Ether1 (Non 802.3af).

Jack: 8-30V DC Dimensions 113x89x28mm.

Weight without packaging and cables: 142g

Power consumption Up to 4W

Operating Temp -20C .. +50C

Operating System MikroTik RouterOS, Level4 license

Package contains RouterBOARD in a plastic case, power adapter

Antennas 1x1 MIMO with two onboard PIF antennas, max gain 1.5dBi

TX power 802.11b: 17dBm @ 11Mbps

802.11g: 15dBm @ 6Mbps to 11 dBm @ 54 Mbps

802.11n: 15dBm @ MCS0 to 9dBm @ MCS7 40MHz

RX sensitivity 802.11g: -92dBm @ 6Mbit/s to -73dBm @ 54Mbit/s

802.11n: –92 dBm @ MCS0 to –67 dBm @ MCS7

Modulations OFDM: BPSK, QPSK, 16 QAM, 64QAM

DSSS: DBPSK, DQPSK, CCK

MikroTik R52nM 802.11a/b/g/n 300mW miniPCI Card

Posted by Admin Saturday, November 5, 2011 0 comments
R52nM dual band miniPCI card (300mW 2.4Ghz & 5Ghz)  Support in 802.11a/b/g/n with MMCX connectors gift you excellent perfomance for your wireless backbone.
Dual band IEEE 802.11a/b/g/n standard
• Output Power of up to 23dBm
• Support for up to 2x2 MIMO with spatial multiplexing
• Four times the throughput of 802.11a/g
• Atheros AR9220, chipset
• High Performance (up to 300Mbps physical data rates and 200Mbps of actual user throughput) with Low Power Consumption
• Two MMCX antenna connectors
• Modulations:
OFDM: BPSK, QPSK, 16 QAM, 64QAM
DSSS: DBPSK, DQPSK, CCK
• Operating temperatures: -50ºC to 60ºC
• Power consumption MAX 1.95W
• ESD protection +/- 12kV

http://www.balticnetworks.com/mikrotik-r52nm-802-11a-b-g-n-300mw-minipci-card-with-(mmcx-.connectors.html).

Mikrotik Wireless Retransmits Check

Posted by Admin Monday, July 18, 2011 0 comments

Wireless retransmission is when the card sends out a frame and you don't receive back the acknowledgment (ACK), you send out the frame once more till you get back the acknowledgment. Wireless retransmits can increase the latency and also lower the throughput of the wireless link.

To check if the wireless connection has wireless retransmissions you need to compare two fields in the wireless registration table: frames and hw-frames. If the hw-frames value is bigger than frames value then it means that the wireless link is making retransmissions. If the difference is not so big, it can be ignored, but if the hw-frames count it two, three or four times or even bigger than the frames count then you need to troubleshoot this wireless connection.

(wm).

New Model Of Mikrotik Wireless Router

Posted by Admin Sunday, July 17, 2011 0 comments

The omnitik is now going to be released. It is a cute little mimo omni outdoor radio, but also has a 5 ethernet ports. The only downside(and only an opininon) is that it is an A/N radio. I would like to see a B/G version. I would love to see the B/G version for golf courses and the like.

7.5 dBi antenna
400 Mhz proc
32 MB RAM
MSRP $119

Webfig Skins

They talk about webfig skins. This gives you the ability to customize the webfig interface. The only downside is that you don’t have the option to make the base page load straight to webfig when you browse to the router. It still loads to the generic Mikrotik screen which gives you the menu options for webfix/winbox/etc.

Wireless Options Simplified

They’ve merged ht-extension-channels into the channel-width option.

SXT Reflector

They highlight a 3rd party reflector that you mount the SXT on that narrows the beam with down by 20 dBi…25 down to 5. They are saying it buys you an extra 7KM.
Nothing really blowing my skirt up, but at least more product is hitting the market.


(gsw).

Wireless Point To Point Setup

Posted by Admin 0 comments
Mikrotik Wireless Point To Point Setup - When you are looking at a point to point (P2P) wireless link you will hear people mention “line of sight”. As in, if I stand at one point can I see where the other antenna will be mounted. I once thought “as long as I can see the other antenna, I’m good…right?” Not exactly. There is this tiny thing called the Fresnel zone.
Wikipedia will give you the complete scoop, so I will paraphrase :) The Fzone is the shape of the wireless signal between two radios.
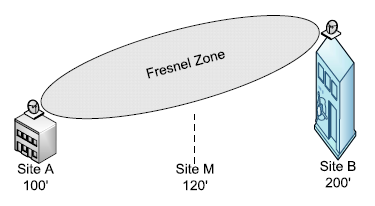
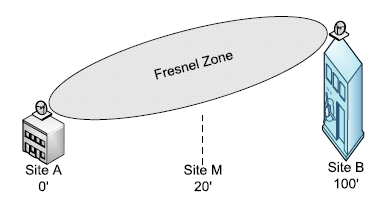
What most people don’t realize is that the wireless Fzone between two radios is shaped like a football. It is actually fatter in the middle and tapers down towards the ends. What this means is that if you have a large obstruction in the middle of your Fzone, you will get degraded signal. Degraded signal means lower throughput and possibly no connection at all! So, how does one figure all this mess out?
Find point A’s elevation, point B’s elevation and the elevation of point M, which is the halfway point between A and B. A great place to find this info is here. This is Daft Logics altitude finder. It will give you the altitude for a point on a google map.
Lets say that site A is 100′, B is 200′ and M is 120′.


Our setup
What we want to do is take the site with the lowest elevation and make it 0 by subtracting itself:
Site A now: 100 – 100 = 0
Then subtract Site A’s original value from the other sites:
Site B now: 200 – 100 = 100
Site M now: 120 – 100 = 20
Site A = 0, site B = 100 and site M = 20.


Leveling the playing field.
Then find the distance between point A and B “as the crow flies”, aka a straight line. You can again use Daft Logic for this.
We will say that our distance is 10 miles.
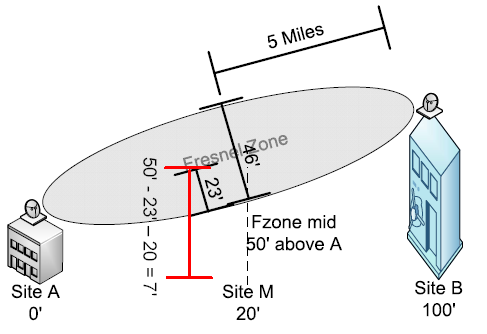
Now visit an Fzone calculator like this one. Put in your distance and frequency and it will give you the height of the Fzone at midpoint. I’m saying my distance is 10 miles and my frequency is 5800. This gives me an Fzone height of 46′ at 5 miles (the halfway point).
So using all of this information I know that my Fzone midpoint will be 50′ at 5 miles(site A elevation + site B elevation / 2). This is the center of the Fzone at 5 miles, and we know that from our Fzone calc that the Fzone is 46′. If we divide that in half, we get 23′. So now we take our 50′ midpoint for the Fzone, subtract 23′ and last subtract the mid point M’s elevation which is 20 and we end up with 7′.


That's a spicy meatball.
It looks like the earth isn’t hitting our Fzone, but if anything stands higher than 7′ at that mid point, it will start to eat into our Fzone. What can we do? We can raise up our antennas to increase our distance from earth.

(gsw) .